*NOTE: It is recommended that prior to using this lesson, you introduce the topics of germs on hands and surfaces via the Healthy Habits lessons: Now You See It! and Germs: Don’t Pass Them Along!
Hand Washing
Hand Washing for Kids Lesson Plan
The Big Idea: Students will take what they have already learned* about proper handwashing steps to the next level by sharing their knowledge and communicating healthy messages to their peers, school, family and community with a creative poster campaign.

Download Calling All Kids: Be A Handwashing Expert PDF!
Goals and Skills
Students Will:
- Review and sequence proper handwashing steps
- Identify parts of speech and practice constructing sentences about handwashing
- Create handwashing messages to share what they have learned with their school community and family to promote healthy habits
Supplies and Preparation:
- Chart paper
- Index cards
- Art supplies (poster paper, color markers, crayons, markers, color pencils, glue sticks, tape, scissors)
- Make copies of the student handout Test Your Handwashing IQ: Become an Expert!

Background for Teacher:

Teacher Tip
If you created the Germ Path Experience Chart in Germs: Don’t Pass Them Along!, now would be a great time to recap ways germs can be passed along, and then circle back to “why” and “how” in this activity. Remind students to think of the various times during the day that they should watch for potential germ contact points (in the restroom, before going through the cafeteria line, etc.).
Answer Key for Test Your Handwashing IQ: Become an Expert!
- The sentence explains WHY handwashing is important.
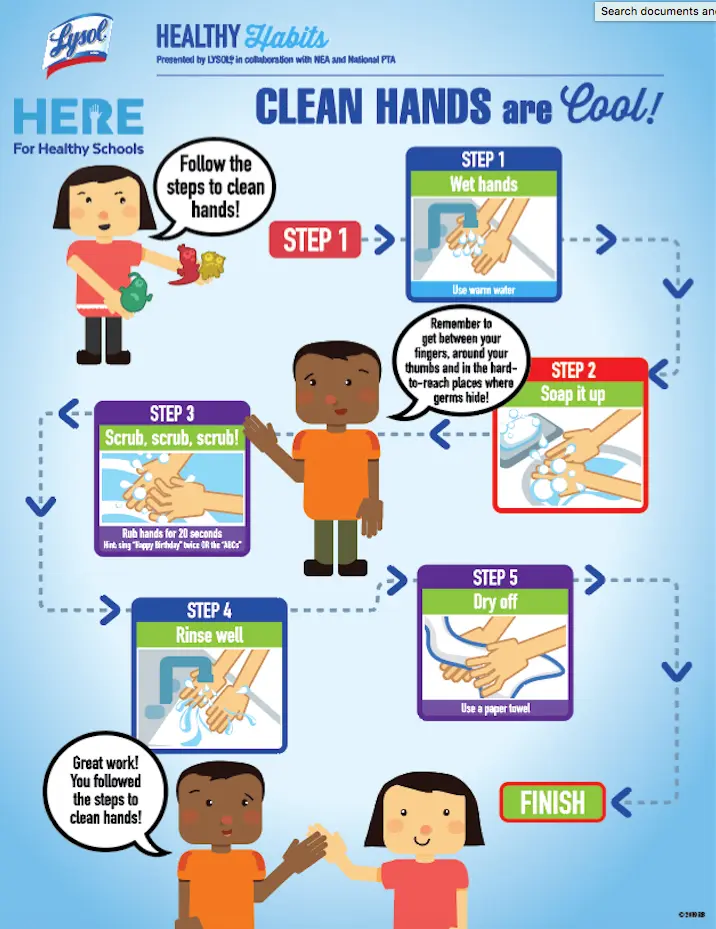
- The correct order of steps is: 1) Wet your hands… 2) “Lather” (make soapy bubbles) by rubbing your hands… 3) Keep scrubbing your hands… 4) Rinse your hands… 5) Dry your hands…
- The sentences in Exercise 2 explain HOW to wash your hands.
- Wash hands: 1) BEFORE 2) AFTER 3) BEFORE 4) AFTER 5) AFTER 6) BEFORE, AFTER 7) AFTER 8) AFTER
- Verbs: eating, using, treating, blowing/coughing/ sneezing, touching, preparing, handling, touching Nouns: food, toilet, cut/wound, nose, animal/ animal food/animal waste, food, pet food/pet treats, garbage
INSTRUCTION STEPS
1. Germs 101.
Begin by reviewing what students know about handwashing while allowing them to practice their literacy skills, including reading, writing, and language comprehension.
Provide each student with a copy of the handout Test Your Handwashing IQ: Become an Expert! Go over the instructions to each question with students. Students may work individually or with partners to complete the questions. Once everyone has completed the handout, review answers together as a class by asking students to read sentences aloud.
2. Germ Hotspots.
Germs have places they often gather at school! Many of these are places that are frequently touched, such as the water fountain handle, doorknobs, and bathroom sinks. Have your class brainstorm others and create a list of potential “germ hotspots” throughout the school where germs might be found. Encourage them to start with the classroom you are in, and then think about where else they spend their time during the school day.
Prompt them with the following questions:
- What objects do you touch in this classroom every day?
- Where do you go and where do you spend time throughout the school, in addition to our own classroom?
- What objects in the school do lots of people touch?
Keep track of student answers on chart paper. Some of the most common “germ hotspots” are the frequently touched surfaces in the bathrooms, library, cafeteria, gymnasium, nurse’s office, and main office, such as doorknobs, drinking fountain handles, light switches, table and desk tops, writing tools (shared pens, pencils and pencil sharpeners), computer lab keyboards/mice, etc.
3. Healthy Poster Campaign!
Using the initial germ review activity and handout as a springboard, challenge students to create handwashing sentences/ messages that can be promoted throughout the school community. Allow students to work in pairs or groups of three. Ask them to think about facts they might use to persuade others to adopt healthy handwashing practices, and encourage them to first think about where their posters will be displayed.
Ask:
- What visuals can you show to help make your message clear?
- What verbs do you want to use?
Now, using these facts/sentences/messages, students will continue to work in small groups to create a series of posters. Completed posters will be displayed throughout the school; ideal placement is near “germ hotspots” to remind others in the school community to wash their hands.
Provide groups with poster board and art supplies. Designate a couple of “germ hotspots” for each group to target as they create their posters. Encourage them to use catchy visuals and descriptive yet clear language and lettering. Remind them that their posters need to capture people’s attention and communicate a clear message.
Provide students with the following guidelines:
- What is your message?
- What is the action?
- Do you explain “why” your message is important?
- Be clear!
- Make it visual!
4. Share and Compare.
Once the posters are completed, have groups share their posters with the rest of the class. For each poster, prompt the class to evaluate it by asking: Is the message clear? Do you know what action to take? Do you know why?
Using index cards, have each student write a “glow” (i.e., What do they like about it?) and “grow” (i.e., What can be improved?) comment for each poster. Allow groups to use the glow-and-grow feedback to revise their posters and messages before hanging them up around the school.
5. Reflect.
Have students reflect and write a few sentences about what they learned about sharing healthy messages with other people.
- Why was it important to share these messages?
- What did you enjoy about the activity?
- What outcome do you hope to see as a result of your poster campaign?
Ask them to create a list of potential “germ hotspots” at home or in public places where they spend a lot of time.
6. Extend the Lesson.
Students can create short jingles, raps, or skits using the facts collected and messages created in the beginning of the lesson. They can be performed during a school assembly or parent night.
7. Home Connection.
Have students bring their lists of at-home “germ hotspots” and work with their families to create visual signs and reminders to post around the house. For example: in the kitchen near the countertops, in the bathroom, above light switches, etc.
Download Calling All Kids: Be A Handwashing Expert PDF!
DISCLAIMER:
Healthy Habits® is Presented by Lysol® in collaboration with NEA and National PTA
SOURCES:
Education Standards: (NHES) Health: 1.2.1, 1.2.3, 4.2.2, 5.2.1, 6.2.1, 6.2.2
(HSELOF) Head Start: P-ATL 8, P-ATL 13, P-LC 6, P-MATH 10, P-PMP 2, P-PMP 3, P-PMP 4
For more resources, visit CDC – Be A Germ Stopper Poster
https://www.cdc.gov/handwashing/pdf/294906-handwashing-superhero-boy-p.pdf
https://www.cdc.gov/handwashing/pdf/294906-handwashing-superhero-girl-p.pdf
CDC – Healthy Schools Parent Engagement Materials https://www.cdc.gov/healthyschools/parentsforhealthyschools/p4hs.htm
CDC - BAM! Body and Mind https://www.cdc.gov/healthyschools/bam/teachers.htm
CDC - Handwashing Posters https://www.cdc.gov/handwashing/posters.html
CDC- Handwashing Stickers https://www.cdc.gov/handwashing/stickers.html


